SharePoint 2013 form with related items list (part 1)
Note: This entry is outdated. The current version of Forms Designer contains ‘Related Items’ control which can be distributed anywhere in the form and quickly configured via its properties. Please, see our article about this new functionality. And of course, if you already have a license you can upgrade it to the latest version for free.
One of the usual cases of our customers is to create a form with related items, e. g. an order form with the list of items of the order. I will demonstrate how to place related items in the separate tab of the parent form and add or edit them directly in the current tab. I divided this manual into 3 parts:
- Display form
- Edit form
- New form
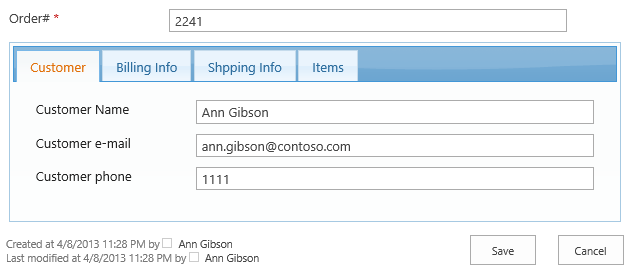
In this entry I will show how to create a display form with tabs and place related items into the separate tab. I created the list of orders and the list of order items with the following columns: Product Name (renamed Title), Weight, Width, Height, Depth, Quantity and Total price. I added lookup field OrderNum into the list of order items to link items with the order.
First, I designed forms of an order with Forms Designer, added tabs ‘Customer’, ‘Billing Info’, ‘Shipping Info’ and ‘Items’. I will put related items in the ‘Items’ tab, which is now empty. Here is my form:
Next, I changed the order items list setting to open forms in a dialog window. So users will be able to edit order items directly from the order form without leaving it. The described option is located here: List Settings -> Advanced settings -> Launch forms in a dialog
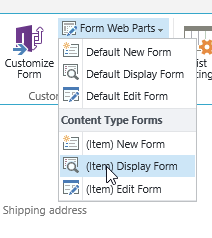
Now, go to the orders list and select List tab in the ribbon. Choose Form Web Parts drop down and select (Item) Display Form:
Click ‘Add a Web Part’ and select Order Items list. In the web part menu select ‘Edit Web Part’ item.

We will not allow users to edit the list of items in the display form of an order. So, first of all we have to disable links ‘new item’ and ‘edit’ on the top of the list. Change Toolbar Type to ‘No Toolbar’ in the settings window.
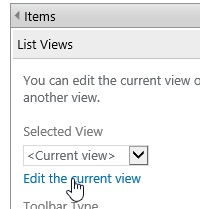
Next, click ‘Edit the current view’ link:
Here remove ‘Product Name (linked to item with edit menu)’ column from the view and replace it with Product Name (linked to item). Now users will not see an order item’s context menu.
In the ‘Totals’ section I added the sum of Total Price to display it for the selected order. Ok, save the view. Next, we have to move the list of order items into the ‘Items’ tab and filter them by the current order.
Open Forms Designer editor for Orders list and select Display Form. Open JavaScript editor. The following JavaScript takes the first web part and replaces it into the fourth tab:
var wp0 = $('div[id^="MSOZoneCell_WebPartWPQ"]:eq(0)');
wp0.detach().appendTo('#fd_tabcontrol-0-tab-4');
When user clicks anywhere on the table of items, new tabs appear in the ribbon: Items and List. We have to disable this functionality to forbid users to edit the list of order items from a display form of an order. Paste the following row into JavaScript editor to disable mouse and keyboard events:
wp0.attr("onmouseup", "").attr("onkeyup", "");Ok, save the display form, close Forms Designer and open any order in the display mode. Now you can see that the order items list appears in the ‘Items’ tab. The last thing we have to do is to filter this list by the current order. Open our display form in SharePoint Designer. Files generated with Forms Designer start with fd_{Content Type Name}_{Form Type}. So, my display form is called fd_Item_Display.aspx.
Find XsltListViewWebPart that renders Order Items list. Add a new binding parameter into ParameterBindings section:
Here we bound OrderId to get-parameter ID that contains the current order id value. You can find more info about parameter bindings here:
http://blogs.msdn.com/b/joshuag/archive/2009/04/06/dataformwebpart-parameters-and-parameterbindings.aspx
Now we can use ‘OrderId’ parameter in CAML-query:
{OrderId}
‘OrderNum’ is an internal name of my lookup field. Place the code above into Query section and save the page.
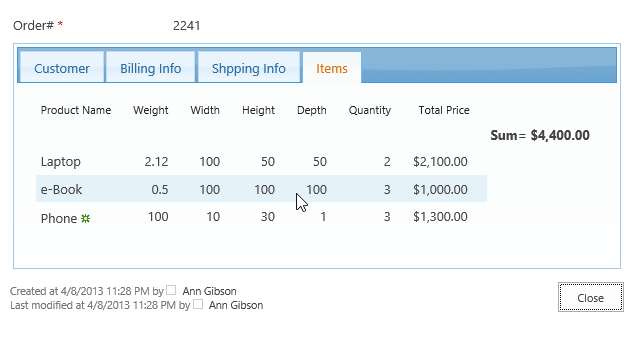
Now on the display form of an order we can see order items related to the current order only. Here is my final display form:
When users click on product name they see display form of an item in a dialog window:
