SharePoint 2013 form with related items list (part 2)
Note: This entry is outdated. The current version of Forms Designer contains ‘Related Items’ control which can be distributed anywhere in the form and quickly configured via its properties. Please, see our article about this new functionality. And of course, if you already have a license you can upgrade it to the latest version for free.
I have started a series of posts about creating forms with related items. In the previous post I described how to do that in a display form. Now I will demonstrate how to place related items into an edit form and edit them directly in it.
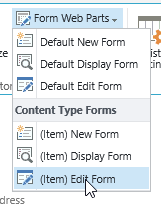
Like in the case of a display form, we have to place additional web part with the list of related items into an edit form . Navigate to the parent list, select List tab in the ribbon and select (Item) Edit Form in the drop down menu of the Form Web Part:
Click ‘Add a Web Part’ link at the top of a page and select related items list in the web parts dialog. You can see the following text at the top of the inserted list:
We have to disable in-place editing because if the user adds a new item in this mode they have manually fill order number. Here is the illustration:
So, we will remove in-place editing from this list and I will show how to fill order number automatically in the new form of a related item. Generally, I recommend you to minimize the number of ways of editing related items, because you can get stuck with many issues related to the ribbon, automatic redirection from the parent form and etc.
Now, let’s remove in-place editing link. Save the form, go to the list of related items, open its settings page. Click Advanced Settings and disable Quick edit:
Return to the parent list and open its editing form in edit mode as we did above. As you can see there is only one link at the top of the related items: ‘new item’. Great, now open properties of this web part and click ‘Edit the current view’ link. Like in the case of the display form, lets remove ‘Product Name (linked to item with edit menu)’ column from the view and replace it with ‘Product Name (linked to item)’. Next, uncheck ‘Allow individual item checkboxes’ in the Tabular View section.
This way we disable the context menu and ribbon and leave an only way for editing items: user has to open them in a dialog window and remove or edit them from its ribbon.
Also remove ‘OrderNum’ column from the view, because there will be items related to the current order only. Like in the case of display form I have added total price into my view.
Save view and the edit form and go to Forms Designer. Select Edit Form, open JavaScript editor and past the same script like in the case of Display form:
var wp0 = $('div[id^="MSOZoneCell_WebPartWPQ"]:eq(0)');
wp0.detach().appendTo('#fd_tabcontrol-0-tab-4');
wp0.attr("onmouseup", "").attr("onkeyup", "");
I will not comment on it, you can find the description in the first post. Apart from this, we have to add the current order number into the ‘new item’ link of the list of related items to prefill it automatically in the new form of an item. Add the following JavaScript into editor:
var newItem = wp0.find('.ms-list-addnew a');
// getting query string hash
var queryString = SP.ScriptHelpers.getDocumentQueryPairs();
// adding get-parameter 'order' into new item link
newItem.attr('onclick', 'NewItem2(event, "' + newItem.attr('href') + '&order=' + queryString['ID'] + '"); return false;')
Save the form and close Forms Designer. Now open SharePoint Designer and add filtration to the related items by the current order as described for the Display form.
Finally, we have to modify a new item form to automatically fill ‘OrderNum’ column based on the provided get-parameter. Open the new form in the Form Designer, distribute fields in the form and open JavaScript editor. Paste the following code there:
// getting query string hash
var queryString = SP.ScriptHelpers.getDocumentQueryPairs();
// fill order number
fd.field('OrderNum').control().value(queryString['order']);
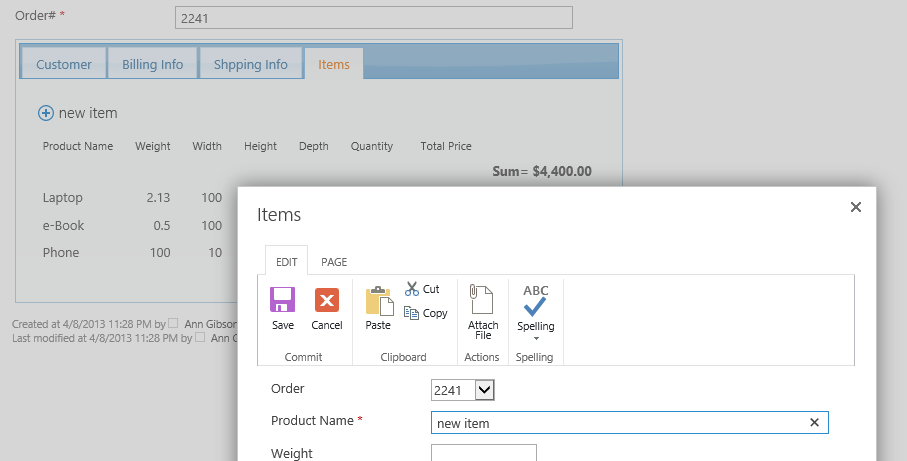
Now, when I click a ‘new item’ link from the Edit form of the order, the ‘OrderNum’ field is prefilled automatically with the current order number:


