Publish the designed form to any page within the current site
In this article I am glad to present a new feature which allows to publish the designed forms to wiki, publishing and web part pages within the current site. It was implemented in SharePoint Forms Designer 2.8.6 which has been available for downloading since January, 27. I will now demonstrate how to use it in a real scenario.
Let us say that we have a helpdesk system and wish to create a compact homepage with the most important information and actions for our requestors. This page will contain the list of issues created by the current user, and a form on the right side for creating a new issue with essential fields only. For this case we should create a new page ‘/SitePages/Requestor.aspx’ based on ‘One column with sidebar’ layout and place the list of issues filtered by the current user and grouped by status in the main column. Now, let us design a form for creating new issues for the sidebar. Go to the list of issues and open Forms Designer from the ribbon.
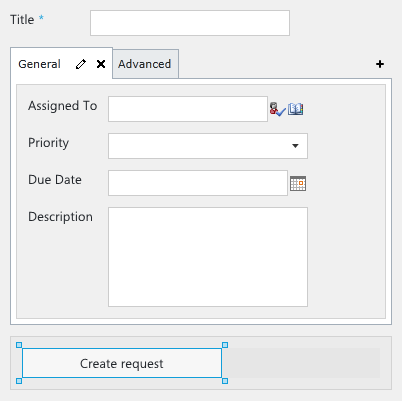
I designed a compact form with two tabs, the first for the most valuable fields whereas the second for additional information, e.g. category of an issue and attachments. At the bottom of my page I left Save button only and renamed it to ‘Create request’. You can enable customization of bottom panel containing Save/Cancel buttons via ‘Buttons’ command in the ribbon.
As you can see, my form is small enough to distribute it at the sidebar of our homepage for requestor:
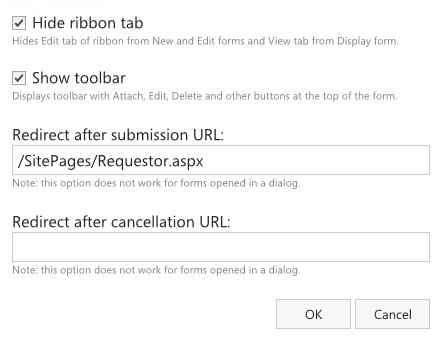
In the ribbon of Forms Designer you can see a new button ‘General’ in Settings section. Click it.

Here you can find settings to change visibility of the contextual tab of the ribbon and the toolbar of actions which duplicate those in the ribbon, e.g. attach, delete, etc. Next, there are two inputs for URLs where the current user will be redirected after submission or cancellation. By default, users go to the default view of list. So, I hid the ribbon, made the toolbar visible to allow users to attach files and set URL for redirecting after submission to ‘/SitePages/Requestor.aspx’:
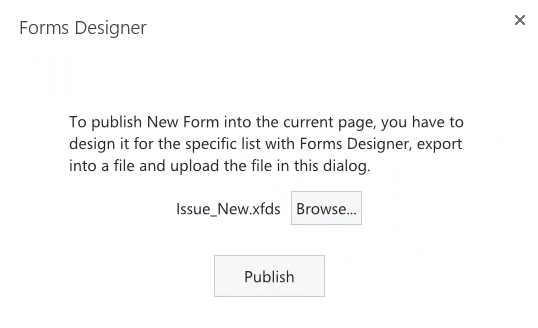
Now, we have to export the designed form into a file:

Ok, let us go to the requestor homepage and open it in edit mode:

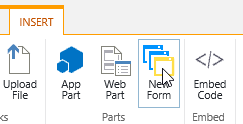
Put the cursor into the sidebar and select Insert tab in the ribbon:
Click New Form and choose the exported form in the dialog:
In the example above I have demonstrated how to publish the designed forms to wiki pages, but you can also distribute your forms on publishing and web part pages in absolutely the same way. Also note that you do not have to save the designed form in Forms Designer, just export it into a file. So, you can have different forms for creating items from multiple pages and from the list itself. If you need to modify the published form, you can import it into Forms Designer, make changes, export into a file and publish into the page as described above. The existing form will be replaced.
Please, leave your questions.